CTMH is having a "Share the Love" video contest. CTMH consultants all over the country are creating videos sharing what they love most about Studio J, our online scrapbooking program. This is my favorite so far. It really puts things into perspective and reminds us what scrapbooks are all about. It is created by my very talented and amazing friend, Tresa Black. Click here to try Studio J out for yourself and share your story.
Wednesday, March 30, 2011
Springin' Up Flowers
3 dimensional flowers on cards, scrapbook pages, and other crafting projects are really hot right now. Check out this tutorial using our new Spring Up stamp set.
Sunday, March 27, 2011
Simply Sophisticated

“Simplicity is the ultimate sophistication,” said Leonardo da Vinci, and who could argue with that great artist? The seeming simplicity of the My Acrylix® Fill In the Blanks stamp set (D1465) is what makes it such a perfect—and perfectly versatile—addition to any stamper’s toolbox!

The words and outline images that make up this set really lend themselves to a variety of looks and techniques. Let’s take a peek at some artwork!

The butterflies on this card are stamped tone-on-tone using the small butterfly image from the Fill In the Blank set, and then we took word stamps and stamped them in first and second generation to create our own patterned paper.

We’ve also used the small butterfly stamp on this layout, but can you guess what other stamp we used from the set? If you guessed “flower,” you’re right! Since our My Acrylix stamps are flexible, we’ve scrunched up the flower stamp in different ways to get these cute cloud images. We stamped them on B&T Duos® paper to give them a subtle pattern.

For this card, we cut out the large butterfly stamp image a few times and then layered it to make it dimensional. Here are the steps so you can make it yourself:
- Stamp butterfly with Desert Sand ink on Colonial White cardstock. Using a craft knife, cut along wings, leaving body intact. Mount cardstock piece on Cocoa cardstock and Bamboo B&T paper. Pop up wings using 3-D foam tape.
- Stamp butterfly again on Crystal Blue B&T paper. Cut out entire image, omitting body. Mount on Colonial White butterfly using 3-D foam tape.
- Stamp butterfly a third time on Sweet Leaf B&T paper. Cut out entire image, including body, and mount on Crystal Blue butterfly with 3-D foam tape.
- Accent body with Opaques Mocha adhesive gems.

Spring/Summer 2011 Idea Book, page 96
This card, featured in the Spring/Summer 2011 Idea Book on page 96, also shows the stamping on B&T paper technique. This time we used the bird stamp, and the background pattern is much stronger. To give visual variety, we stamped the bird’s wing on a complementary piece of Grey Wool cardstock. Then, we stamped three different sentiments with Grey Wool ink, then highlighted one of them by stamping over it in Goldrush ink. This brings in a third color and makes the “friends always” sentiment stand out as the main message of the card.
Spring/Summer 2011 Idea Book, page 96
Does this card look familiar, too? It’s also from the Spring/Summer 2011 Idea Book on page 96. Check out the Hollyhock cardstock on the sides. We stamped the flower on it in a repeating pattern to make an abstract, subtle patterned paper. Notice how the petals overlap in various spots? This gives the flower image a whole new look!
And here’s a final technique for you: using the stamp set as a cutting guide for negative space then filling it with a patterned paper to give visual interest. To create the stars you see in this layout, follow these steps:
- Stamp three stars on top of your layout, overlapping paper pieces and photos.
- Use a craft knife to cut out the center, leaving a 1/8" border, and distress the edges with a stipple brush dipped in Desert Sand re-inker.
- Stamp three 2 1/2" × 2 1/2" pieces of Colonial White cardstock with words or phrases, using Cocoa ink and first, second, and third generation.
- Attach the cardstock pieces to the back of your layout so the sentiments show through.
- Accent each star with a pair of Opaques Mocha adhesive gems to give them even more zing!
Thursday, March 24, 2011
Hope For Japan Stamp Set
 |
| Click here to order |
Studio J Tutorials
Want to know more about Studio J and some fun things you can do with it? Amy Ulen, a fellow CTMH consultant created some very cool tutorials from beginning to advanced. I've posted them permanently on my Studio J page of this blog. I look forward to more! Thanks so much Amy!
Monday, March 14, 2011
My Studio J Marathon
In May, CTMH is holding a Studio J Boot Camp for consultants. They will be training us on everything Studio J. When I first heard about this camp, I was so excited and determined to go. However, when it came time to register, I realized that I hadn't done what I needed to do to qualify to attend this event. I met all requirements except one...I needed to have personally created a minimum of 20 layouts on Studio J. I had created several layouts prior to some of the program upgrades, but they weren't counted. I was 15 layouts short! I thought there was no way that I could do 15 layouts in one day...and even if I could, the event would surely fill up before I could register. Then, Friday morning, I got a call from my dear friend Sheena who works at CTMH and she encouraged me to try. Well, of course I could do 15 layouts if I didn't add any of my own creativity, but that's not the way I roll. I decided to try but I had to hurry because there were only three spots left. SO I sat down and became incredibly focused on my goal. I'm sure ya'll can now guess that I finished those 15 layouts and discovered some really fun advanced techniques like creating my own B&T, customizing embellishments, and more. I'm so glad I took this challenge! And now there's only 2 spots left (as of Friday night)!
Here are my layouts. Enjoy!


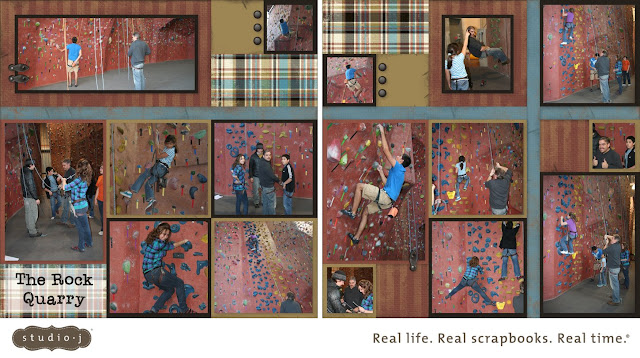
Here are my layouts. Enjoy!


Thursday, March 10, 2011
Recently, I attended a wedding of my dear friend, Karen Pedersen's son. Many of you know her and how talented she is. Well, it's not unexpected that she has surrounded herself with equally talented people. Her friend, Tracy Mason created this amazing "cake" completely out of paper!!!! At the top of the cake, there is a slit that holds a gift card. Needless to say, I was floored by this amazing creation!
My prayers were answered when Tracey made a video tutorial on how to create these paper roses.
I have been inspired by Tracey and have been looking for an opportunity to share these flowers with my customers. This month I'm featuring the Sweetheart WOTG and couldn't wait any longer. I finished my layout last night. Check it out!!!


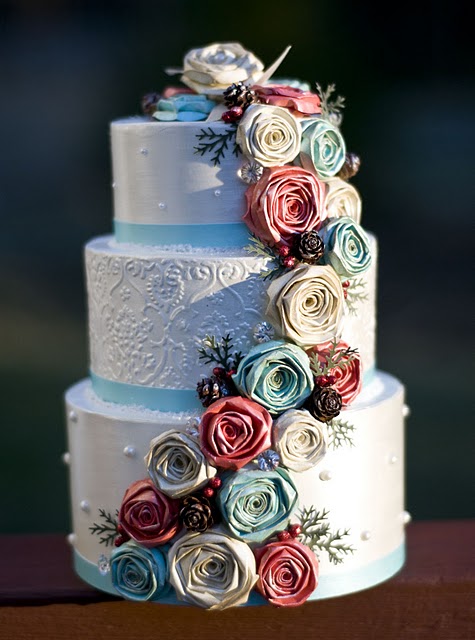 |
| Click on this picture to go to Tracey's blog and learn more about this project. |
I have been inspired by Tracey and have been looking for an opportunity to share these flowers with my customers. This month I'm featuring the Sweetheart WOTG and couldn't wait any longer. I finished my layout last night. Check it out!!!


Subscribe to:
Posts (Atom)